ThinkPHP集成PHPMailer发送邮件
作者:来源:转载发布:2016-04-10阅读:3774
原文地址:http://www.awaimai.com/604.html
如需转载此文,请注明原文转载地址,以尊重原创人员!
标签:thinkphp,phpmailer
下载 PHPMailer
发送邮件需要两个文件,如下:
class.phpmailer.php
class.smtp.php
下载地址:https://github.com/PHPMailer/PHPMailer
如果要用POP3接收邮件,还需下载 class.pop3.php 文件,本文主要讲发送邮件,收邮件方法类似。
部署文件
将下载的 class.phpmailer.php 和 class.smtp.php 文件放到 ThinkPHP/Library/Vendor 目录下:
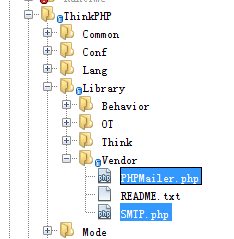
分别重命名两个文件为:PHPMailer.php 和 SMTP.php 。
使用
使用方法简单,首先在需要用 PHPMailer 类的文件,使用 vendor() 方法导入这两个类文件:
 vendor('SMTP');
 vendor('PHPMailer');
然后就可以开始用了:
$mail = new \PHPMailer;
//$mail->SMTPDebug = 3;    // Enable verbose debug output
$mail->CharSet = 'UTF-8';    // Set CharSet to UTF-8
$mail->isSMTP();         // Set mailer to use SMTP
$mail->Host = 'smtp1.example.com;smtp2.example.com';  // Specify main and backup SMTP servers
$mail->SMTPAuth = true;    // Enable SMTP authentication
$mail->Username = 'user@example.com';     // SMTP username
$mail->Password = 'secret';  // SMTP password
$mail->Port = 25;        / TCP port to connect to
$mail->setFrom('from@example.com', 'Mailer');
$mail->addAddress('joe@example.net', 'Joe User');    // Add a recipient
$mail->addAddress('ellen@example.com');           // Name is optional
$mail->addReplyTo('info@example.com', 'Information');
$mail->addCC('cc@example.com');$mail->addBCC('bcc@example.com');
$mail->addAttachment('/var/tmp/file.tar.gz');       // Add attachments
$mail->addAttachment('/tmp/image.jpg', 'new.jpg');     // Optional name
$mail->isHTML(true);                        // Set email format to HTML
$mail->Subject = 'Here is the subject';
$mail->Body    = 'This is the HTML message body in bold!';
$mail->AltBody = 'This is the body in plain text for non-HTML mail clients';
if(!$mail->send()) {
    echo 'Message could not be sent.';
    echo 'Mailer Error: ' . $mail->ErrorInfo;
}
else{
    echo 'Message has been sent';
}
这样就可以了。